
 Charles Burnett
Amortization Deep Dive: The Rule of 78s
As we talked about previously, there are many reasons why understanding amortization methods is helpful for financial professionals. Today, we’re...

One doesn’t need to work in the finance industry very long to realize how complicated everything is.
This is no more apparent than when the employees of a lending institution are in the thick of managing borrower accounts. Every borrower is different! Everyone has different payment schedules, case-by-case considerations, hardships, years of patronage, risk levels, et cetera. What’s more, all of this information is important and your institution can’t afford to forget any of it! This is far too much information for any one teller to remember, and it would be far too wasteful to hunt down that information every time it was needed.
Thankfully, computers exist to do a lot of complicated thinking for us. And the wise developers of the world have come up with methods of getting that information to us quickly and obviously. One such method, which shall be our topic of discussion today, is account alerts. See the red banner at the top of the screen below?
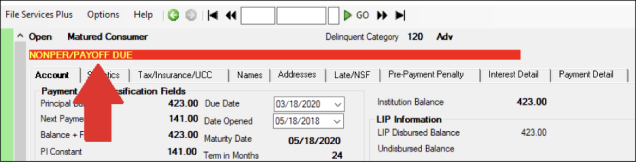
If you’re an employee who serves your institution’s customers by working in GOLDPoint Systems’ loan servicing software (CIM GOLD), you have no doubt seen this banner a lot. It’s designed to provide the user with pertinent account status information at a glance, all in stylish, bright, easy-to-spot red.
The information displayed in the banner can be affected by charge-offs, write-offs, action/hold/category codes, maturity, bankruptcy/judgement, payoff locking, rejected payments, and so on. For the most part, the system will apply these alerts to accounts automatically. But did you know that it’s also possible to create your own custom alerts and manually apply them to individual accounts? What’s more, you can put stops in place to guarantee that employees won’t be able to ignore or forget them.
This option is available thanks to the Client Defined Alerts and Actions, Holds and Event Letters screens. Simply follow the instructions below to learn how to create a new alert and apply it to an account:
1. Access Client Defined Alerts and click <Create New>. Define the following fields:-Nov-04-2020-09-07-37-72-PM.png?width=670&name=image%201%20(1)-Nov-04-2020-09-07-37-72-PM.png)
2. Click <Save Changes>. Once you’ve confirmed that the new alert has been saved, access Actions, Holds and Event Letters and click <Set Alerts> to open the Set Alerts dialog (see below). Note that if this button does not appear, that means your institution does not allow user-defined alerts (although the option can be enabled by contacting GOLDPoint Systems).
-Nov-04-2020-09-09-20-62-PM.png?width=692&name=image%201%20(2)-Nov-04-2020-09-09-20-62-PM.png)
3. The new alert you created will be in the left list. Simply select the alert and use the <Move> button to move the alert to the right list, which is a list of all active alerts on the current account. Click <Save> to close the dialog and your new alert will appear on the red banner.
While you’re at it, note that you can toggle additional features for account alerts in the checkbox fields at the bottom of this dialog. These features include:
GOLDPoint Systems prides itself on the customizability and diversity of our software, and user-defined alerts are just one of many features implemented to ensure that our products provide your institution with the functionality to do things your way.
To learn more about user-defined alerts in CIM GOLD, follow the links in this article or contact your GOLDPoint account manager. To enable the feature at your institution, ask your account manager to set up Institution Option SUDA.

As we talked about previously, there are many reasons why understanding amortization methods is helpful for financial professionals. Today, we’re...

In today's digital age, where online banking and electronic communication have become the norm, ensuring the security of financial information is...

If you spend any amount of time looking over GOLDPoint Systems documentation, you’ve probably come across the term GILA Loan once or twice. But what...

We hope by now you are enjoying 7-days-a-week processing. It’s been a year since our company completely revamped our system to process loan servicing...

Between recency and contractual delinquency, neither is necessarily better or worse for recordkeeping. The method you choose to measure delinquent...

It was almost one year ago when I wrote the blog post about our system processing afterhours seven days a week…except when it comes to late charges....