
 Cindy Fisher
Amortization Deep Dive: The Rule of 78s
As we talked about previously, there are many reasons why understanding amortization methods is helpful for financial professionals. Today, we’re...

Lending institutions have a vested interest in the condition of collateral tied to loans. If the collateral is damaged to the point it isn’t worth much, and the collateral is repossessed due to the borrower not making payments, lending institutions are left scrambling to find other means to force the borrower to pay up.
Therefore, many institutions want to ensure collateral is properly insured so the loan is safeguarded. Most lenders will require borrowers to have full insurance coverage on collateral items, such as a car, until the loan is paid off. Afterall, the collateral is the lender’s asset until the loan is paid off.
It’s a good idea to track third-party insurance policies connected to collateral. That way when insurance policies are scheduled to expire, you can contact the borrower and remind them to renew or offer new insurance policies provided through your institution.
You could also force-place insurance policies on the loan if the borrower refuses to acquire insurance. We’ll discuss that matter in another blog post.
GOLDPoint Systems has tools to allow you to track third-party insurance policies. This three-part process is easy to implement to make sure collateral is properly insured.
Part 1: Add Insurance to the Tracking Insurance Screen
First, you’ll need to add third-party insurance policy information to the Loans > Insurance > Tracking Insurance screen in CIM GOLD. Institution option RDIN must be set for your institution to use this screen. See the Tracking Insurance topic in DocsOnWeb for more information on how to add insurance policy information for tracking purposes to this screen.
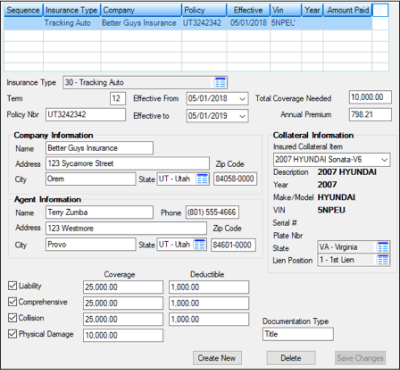
Loans > Insurance > Insurance Tracking Screen
Part 2: Create Tracking Insurance Contact Queue
Now create a contact queue for tracking insurance. Contact queues create lists of accounts matching specific criteria. Employees can use those lists (queues) to contact borrowers via telephone, email, or mail.
Contact queues are created on the Queues > Contact Queues > Definition screen. Once the queue has been defined, employees can use the Contact Queues screen to view accounts in that queue.
In the example below, we named the Contact Queue “Insurance Tracking.”
.png)
You would also use this screen to assign users to this contact queue. See the Contact Queue Definition Screen topic in DocsOnWeb for more information on Contact Queues. Note: Accounts will not show in this queue until the afterhours after Part 3, described below.
Part 3: Creating and Connecting GOLDWriters to Contact Queues
You are now ready to create a GOLDWriter report to pull insurance information matching the criteria you will define in the GOLDWriter definition.
In order for customer accounts to appear in contact queues, you must set up a GOLDWriter report that exactly matches the name of the contact queue (Part 2 above). You can use our example below for ideas on how to set up the GOLDWriter report.
.png)
10. Click <Next> to go to Report Wizard Step 3, then click <Next> again to go to Report Wizard Step 4.
11. Add the following definition to Report Wizard Step 4. This definition states that the Insurance Tracking expiration date must be less than the run date.
.png)
You could also put a date in the future in here like this:
.png)
12. Click <Next> three times to get to Report Wizard Step 7.
13. On Report Wizard Step 7, click <Save>. The Report Setup has been Saved box will appear asking you to make a selection.
14. Click the <Install report as host selection setup for CIM> button, as shown below. During afterhours processing, this report will be saved to CIM GOLD for Contact Queues. Accounts that match the criteria set forth in this report will show up in the Contact Queue we created in Part 2.
.png)
The following day, you can check the queue and assign employees to process those queues on the Contact Queues screen in CIM GOLD. For more information on how to process contact queues, see these topics in DocsOnWeb:

As we talked about previously, there are many reasons why understanding amortization methods is helpful for financial professionals. Today, we’re...

In today's digital age, where online banking and electronic communication have become the norm, ensuring the security of financial information is...

If you spend any amount of time looking over GOLDPoint Systems documentation, you’ve probably come across the term GILA Loan once or twice. But what...

Collateral on a loan is a lender’s asset until the loan is paid off. Therefore, if borrowers are unable or unwilling to obtain adequate insurance on...

Unfortunately, not every borrower at your institution will keep up with their payments. Some of them may even fall behind enough to land themselves...

While Black Friday shopping in November of 2020, I stopped into a well-known women undergarment store that shall remain nameless. The helpful teller...