
 Cindy Fisher
What’s Your Anti-Phishing Strategy?
In today's digital age, where online banking and electronic communication have become the norm, ensuring the security of financial information is...

Mail Merge letters are an important part of collection efforts. If an employee can't reach a borrower through calling or texting efforts, they can create a letter to send to borrowers about unpaid account balances, delinquent accounts, upcoming repossessions, or other negative activity occurring on their account.
IMPORTANT: Your institution must have institution option CQMM (Use Collection Queue Mail Merge System) set up in order to create mail merge letters from Collection Queues. Contact your GOLDPoint Systems account manager if you would like this option set up for your institution.
The actual content of letters is determined by your institution. Generally, setting up a Mail Merge letter in Microsoft® Word only needs to be done once for each type of letter. After that, the merge information can simply be assigned to merge letters, as explained in the following instructions.
Note: These instructions are for Word 2013. The steps may be slightly different if using earlier or more recent versions of Word.
1. Access the Queues Collection Collection Queues screen in CIM GOLD.
2. Select the queue you are working in the Collection Queues list.
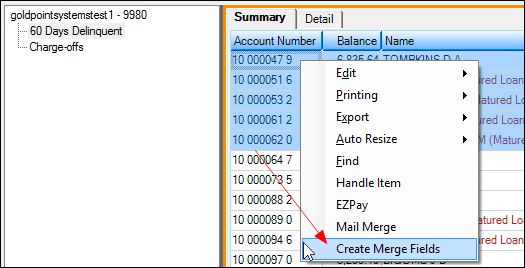
3. Right-click the selected account(s) and select "Create Merge Fields" from the pop-up menu, as shown below:
 The Create Sample Collection Queue Merge File dialog will appear as shown below:
4. Using this dialog, select the location to save the merge fields. This file, when created, does not contain personal customer information. It only creates the merge fields needed in creating a merge document in Word.
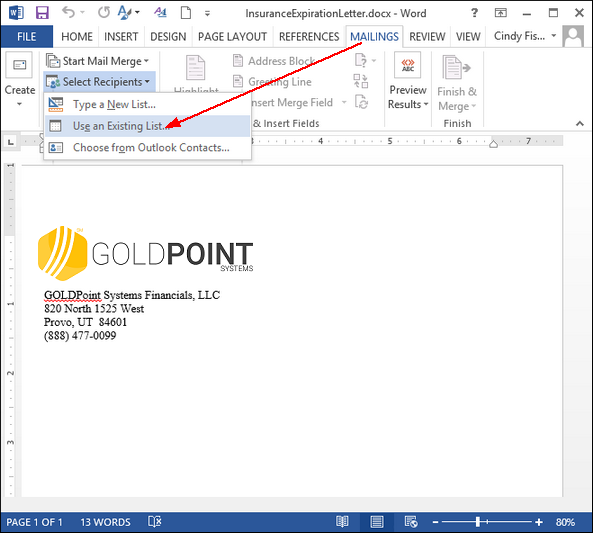
5. Click the Mailings tab, and then click Select Recipients. Select "Use an Existing List" from the list of options (see below).
6. The Select Data Source dialog box appears. Find the merge fields data file saved in step 3 above. Open the file.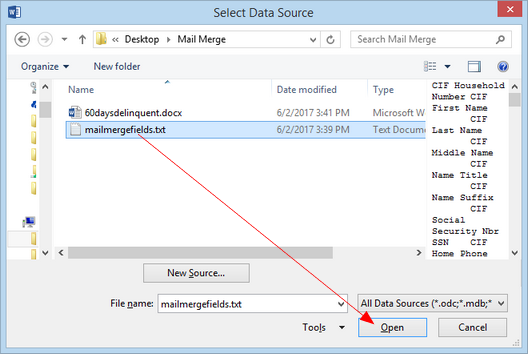
7. Merge fields can now be inserted into the letter that will match up with CIM GOLD information.
Note: If you have any errors trying to load the merge fields, try opening the merge fields file in Excel and saving it as an Excel spreadsheet. Then repeat steps 6 and 7 and select the Excel file instead of the text file (Excel spreadsheets have the extension of .xlsx).
The following steps explain how to insert merge fields. For a list of all possible merge fields and how they match up to fields in CIM GOLD, see Merge Fields in Collection Queues.
8. Place your cursor where the first merge field will go.
9. On the Mailings tab, click Insert Merge Fields, and from the list that appears, select the merge field to insert.
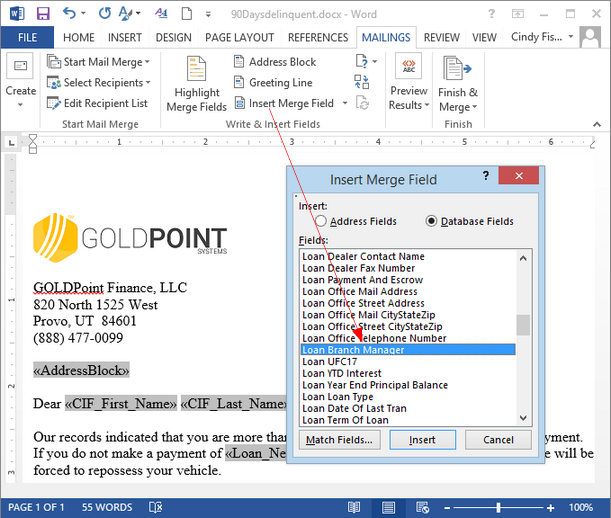
10. The merge field now appears where the cursor was. Continue adding merge fields throughout the document where information from CIM GOLD will be inserted, as seen in the following example (merge fields have a gray background):
11. Save the Word document. It is recommended you save it with the same name as the collection queue (e.g., Repossession Letter, 90-days delinquent, etc.).
12. Close the Word file. Merge letters cannot be printed in CIM GOLD if the Word document is open. Now the letter can be combined with actual borrowers' information using CIM GOLD.
13. From the Collection Queues screen on the Summary tab, right-click on the list of accounts for which you want to send a collection letter. You can select one account, a group of accounts, or all accounts.
Tip: If you want to send a letter to all the accounts in the queue, press Ctrl + A to select all the rows.
IMPORTANT: When more than one account is selected on the Summary tab and more than one account owner is listed on the account, the system creates a letter for the IRS account owner only. Therefore, if you need to create a mail merge letter for each owner on the account, you will need to select the accounts individually, as explained in steps 15 and 16 below.
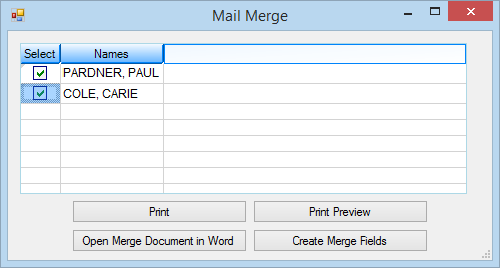
14. Select "Mail Merge." If you only selected one account, the following dialog box appears listing all the names on the account:
If you selected a group of accounts or all accounts, skip to step 16.
15. Check the box next to the names for whom you want to send a letter.
16. Click Print. The Open dialog box will appear.
17. Find and select the letter you created previously (from steps 5-11 above), then click Open. The letters will automatically be printed to your default printer.
Note: When more than one account is selected on the Summary tab and more than one account owner is listed on the account, the system creates a letter for the IRS account owner only. Therefore, if you need to create a mail merge letter for each owner on the account, you will need to select the accounts individually, as explained in steps 14 and 15 above.
18. If in step 14 you clicked Open Merge Document in Word instead of Print, the letter appears in a Word preview screen. From this screen, all the letters selected in the list can be printed, but changes cannot be made from the Print Preview screen.
This letter can be used again and again by anyone at your institution using the CIM GOLD Mail Merge function.
Due to the nature of the Mail Merge function in Word, sensitive and personal information is only temporarily saved to a file on your computer until the preview screen is closed or the letters are printed. CIM GOLD then deletes the temporary file containing sensitive information.
Once a letter has been printed for accounts, "Mail Merge" will be displayed under the Disposition column on the Summary tab list view.
For more information on each of the merge fields available for Collection Mail Merge letters and where the data is pulled from in CIM GOLD, see the Merge Fields in Collection Queues topic in the Queues in CIM GOLD manual in DocsOnWeb.

In today's digital age, where online banking and electronic communication have become the norm, ensuring the security of financial information is...

If you spend any amount of time looking over GOLDPoint Systems documentation, you’ve probably come across the term GILA Loan once or twice. But what...

In today’s world, where sophisticated computers effortlessly crunch numbers and calculate complex payment structures, it might seem redundant for...
Collectors and employees at your institution use Collection Queues to contact borrowers concerning specific activity (or non-activity) on accounts....

We are excited to see many of you at next week’s AFSA conference in Las Vegas, Nevada. Vegas is a lively city known for its bright lights and...

Probably one of the hardest jobs at your institution is that of a collector. Working with the public can be highly stressful, especially with a job...